Rarible is a decentralized marketplace for creating, selling, and buying NFTs. It’s popular for its user-friendly interface, the ability to create NFTs without needing extensive technical knowledge, and its community-centric approach. Rarible also supports multiple blockchain networks, providing flexibility and choice for creators.
Step-by-Step Guide to Creating NFTs on Rarible
Step 1: Set Up Your Crypto Wallet
Before you can create or trade NFTs on Rarible, you’ll need a crypto wallet to store your digital assets and pay for transaction fees. Here’s how you can set up a wallet:
Choose a Wallet: Popular wallets include MetaMask, Trust Wallet, and Coinbase Wallet. For this guide, we’ll use MetaMask due to its ease of use and wide adoption.
Install MetaMask: Go to the MetaMask website and download the browser extension or mobile app. Follow the on-screen instructions to install it.
Create a Wallet: Open MetaMask and create a new wallet. Make sure to securely store your seed phrase, as it’s the only way to recover your wallet if you forget your password.
Fund Your Wallet: You’ll need some Ethereum (ETH) to cover transaction fees. Purchase ETH from an exchange like Coinbase or Binance and transfer it to your MetaMask wallet.
Step 2: Connect Your Wallet to Rarible
Visit Rarible: Go to the Rarible website (https://rarible.com).
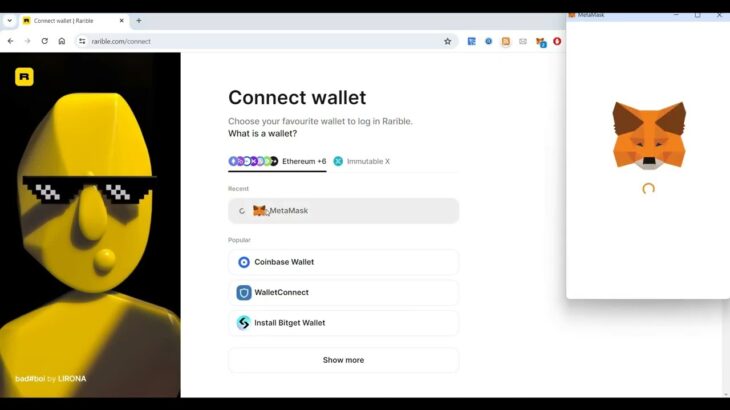
Connect Wallet: Click on the “Connect wallet” button at the top right corner of the page.
Select MetaMask: Choose MetaMask from the list of supported wallets. Follow the prompts to connect your MetaMask wallet to Rarible.
Step 3: Create Your NFT
Now that your wallet is connected, you can start creating your NFT. Here’s how:
Click on “Create”: On the Rarible homepage, click the “Create” button.
Choose Single or Multiple: Select whether you want to create a single edition (one-of-a-kind) NFT or multiple editions (e.g., limited series). For this example, we’ll create a single edition NFT.
Upload Your File: Click “Choose File” to upload the digital file you want to turn into an NFT. This could be an image, video, audio file, or any other supported format.
Fill in Details: Enter details about your NFT, including:
Title: The name of your NFT.
Description: A detailed description of your NFT. Include information about the artwork, its inspiration, and any other relevant details.
Royalties: Set the percentage of future sales you want to earn as royalties. This means every time your NFT is resold, you earn a percentage of the sale.
Add Properties: (Optional) Add properties, levels, or stats to make your NFT more engaging and detailed.
Set Price: Choose how you want to sell your NFT. You can set a fixed price, auction, or open for bids.
Create Item: Review all the details and click “Create Item.” Confirm the transaction in your MetaMask wallet. This process involves paying a gas fee to mint the NFT.
Step 4: List Your NFT for Sale
Once your NFT is created, you can list it for sale on Rarible:
Go to Your Profile: Click on your profile icon and select “My Items” to view your newly created NFT.
List for Sale: Click on your NFT and then click “Put on sale.” Set the price and choose the type of sale (fixed price, timed auction, or open for bids).
Confirm Sale: Confirm the listing details and approve the transaction in MetaMask. Your NFT is now listed for sale on Rarible.
Step 5: Promote Your NFT
Creating an NFT is just the beginning. To increase visibility and attract buyers, you need to promote your NFT. Here are some effective strategies:
Social Media: Share your NFT on social media platforms like Twitter, Instagram, and Facebook. Use relevant hashtags like #NFT, #CryptoArt, and #Rarible.
NFT Communities: Join and participate in NFT communities on Discord, Reddit, and other forums. Share your work, engage with other artists, and build your network.
Collaborations: Collaborate with other artists or influencers in the NFT space to reach a broader audience.
Content Creation: Create content around your NFT, such as blog posts, YouTube videos, or livestreams, to engage potential buyers and collectors.


